Showing posts with label arrowhead villas. Show all posts

Monday, August 26, 2013

Pinehaus


These are the most current photos of our cabin.  I seriously need a decent camera and when I get it I will post better photos.

This is a three bedroom cabin with two full bathrooms with showers and bathtubs.


The kitchen is on the first level and is definitely our next rehab project.

On the second level there is an open living room with flat screen tv and surround sound.
There is a full bar with small refrigerator
A small balcony with table and chairs off the front of the house
A large wrap around deck with table and benches to the right of the cabin

Guest Room #1has a full size bed

Guest Room #2 has a queen size bed

The master suite is at the back of the house and is our pride and joy.  After one year of remodeling we have finally finished and are quite proud of all of the hard work.

It features a jacuzzi bathtub and detached all glass shower.

Separate commode area with naughty pine door

Queen size bed and flat screen tv

The third level is a loft with drop down ladder.

There are two queen size beds in the loft with a wall splitting it into two areas

All beds feature memory foam toppers and down comforters.


View of front of cabin.  Both levels have balconies.  The top balcony has a table and chairs
This is the side view of the cabin.  The driveway is large enough to hold 6 cars


The deck on the second level features a table and benches 


Rear of deck
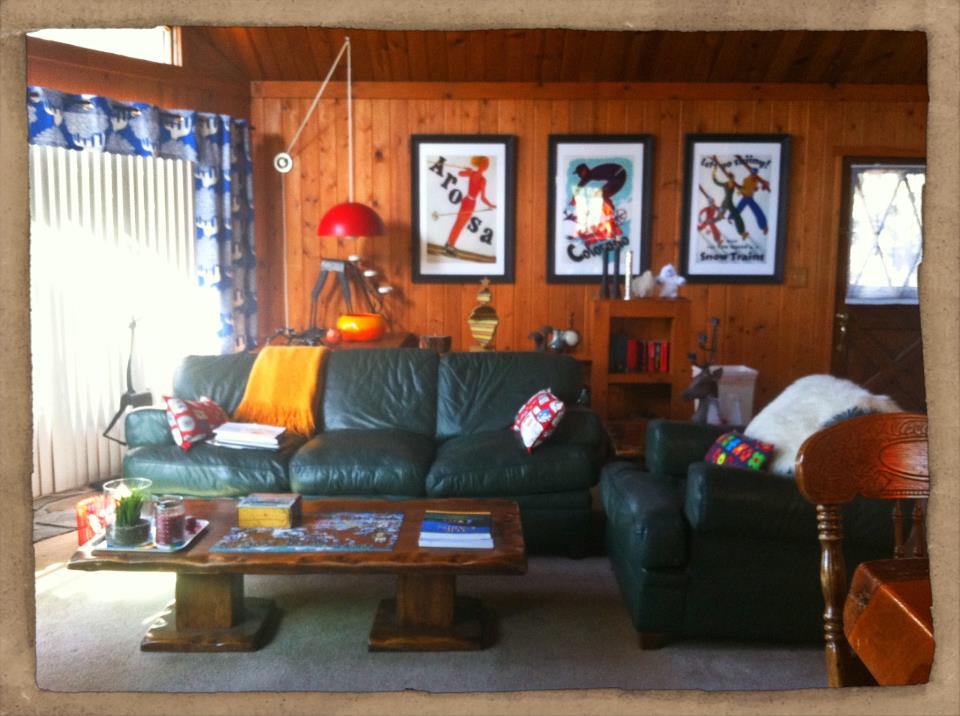

Main living are with comfy leather sofa  ~ full bar ~ flat screen TV ~surround sound


We have mixed vintage, contemporary and rustic styles to give it our own touch


Table on upper deck


Multiple bird feeders.  We get a lot of birds including woodpeckers, finches and our favorites....Stellar Jays.  Make sure to put peanuts out front so that they will come to visit you on your stay.


Guest Bedroom # 1


New carpet in the loft (yes!  I love Orange)


Loft


Loft (lighting and flooring have been replaced since this photo was taken)


Guest Bedroom #2


Master Suite:  Genuine queen size log bed


Commode is to the left
Jacuzzi Bathtub


New tile flooring.
New Vanity and lighting (mirror not shown)
Glass walled shower


Brand new hickory hard wood floors


Monday, March 11, 2013

It's All in the Details...

I'm having so much fun decorating the cabin.  I want to keep it feeling "Cabiny" but also modern. Here are just a few shots of the decor...


This is a spice rack that my dad made when he was in shop class in high school.  I love the industrial look blended with the softness and bright pop of color with the flowers


I spray painted pinecones that I found in our backyard with a high gloss blue spray paint.  I love how they are organic but have a synthetic look to them.  Almost like plastic. 


 I love these Vintage Posters.  I also ordered some really cool reproductions from the post office that I'll be hanging in the bedrooms soon


Joseph had these vintage deer antlers shipped in from the Black Forest area of Germany.  They creep me out a bit but they're perfect for a cabin


My sister and I recarpeted the loft with with these bright orange carpet tiles.  It's bright but it adds such a fun pop of color to the loft.

The Pine Trees in the foreground light up and make a perfect night light


Continuing with the orange them I made curtains from this fabric to cover the window behind the bar


I bought this antique chair to sit in a nook in the master bedroom


This is the bear bottle opener that hangs in the bar.  Be careful when using it, we've had a few bottle casualties so I guess it's more for the novelty than anything


This poster was created by my dear friend and Art Director Alex Kirwan.  It hangs in one of the guest room


I love these felt placemats with the little squirrel cutouts 


Thursday, March 7, 2013

Ice Votives

I made these for New Years Eve and they looked so pretty outside in the snow.


They were super simple to make.  All you do if fill water balloons with, well water.

Place them outside or in the freezer until they are almost frozen all the way through.

Once they feel hard on the outside, cut the balloons and remove them.

Use a screwdriver to crack a hole in them that is large enough to put a votive candle in.

Empty any water that hasn't frozen.

There you have it.  They actually lasted longer than I expected even though they had a candle burning inside.


Instagram

Wednesday, March 6, 2013

During the Renovation


Let the party begin.  This is Joey and his younger brother at the beginning of their venture.  The multiple levels have been brought down to a single plain.  The shower removed and plumbing exposed.


This used to be the shower and that was the original placement of the toilet.


The drywall is attached to the walls with a few more pieces to go.


Somehow he managed to make a perfect cut with every single piece of drywall.  I got to help on these high pieces.  Phew, I'm exhausted.

He started the tiling at this point and you can see the framing for the water closet and the jacuzzi tub.


It's hard to see what the tile looks like, but let me tell you....It's amazingly gorgeous.  The floor tile is a slate colored matte tile and the walls of the shower and bath are the same tile in a high gloss.


I think the tile has been the most difficult part of the process so far.


He installed hardy backer behind the show pan to water proof it.


The he applied the tile using spacers to keep them even.


Using the same technique he put the tile up on the wall next to the bathtub.

Still a lot of work to do and then we take a break before we start the next major renovation....the kitchen!